There are a number of possible causes for DCOM errors.
Solution:
Ping the Client PC to make sure that there is not a network problem.
Check the Windows® Eventlog:
a) Windows Eventlog Error: “CoCreateInstance Failed. The RPC server is unavailable”.
This points to a firewall which is blocking the connection from client to the Therefore™ server. (The Windows Eventlog will show an error which contains this row: “The RPC server is unavailable”).
Configure firewall to allow communication between client and server.
The following ports are used by Therefore™. There are no dedicated Therefore™ ports,Therefore™ is always using Windows default ports.
LDAP: 389/TCP
DCOM (EPMAP): 135/TCP, 137/TCP, 139/TCP
MS-SQL-S: 1433/TCP
MICROSOFT-DS: 445/TCP
HTTP: 80/TCP
Note: Since the Windows Server® 2008 uses a dynamic port range for incoming connections, it is not possible to forecast which port has to be opened.
To solve the issue customer can configure DCOM protocol and endpoint on Therefore™ application server.
If the architecture requires static endpoints used by DCOM you have to do the following steps on Therefore™ application server:
- Go to Control Panel > Administrative Tools > Component Services
- Expand Computers > My Computer > DCOM Config
- In the right pane search for Therefore Server
- Right-click on it and select Properties
- Go to the Endpoints tab
- Click Add
- Select Connection-oriented TCP/IP
- Select Use static endpoint
- Enter the port (any unused port) you have opened in your firewall for DCOM in the box next to the selected option
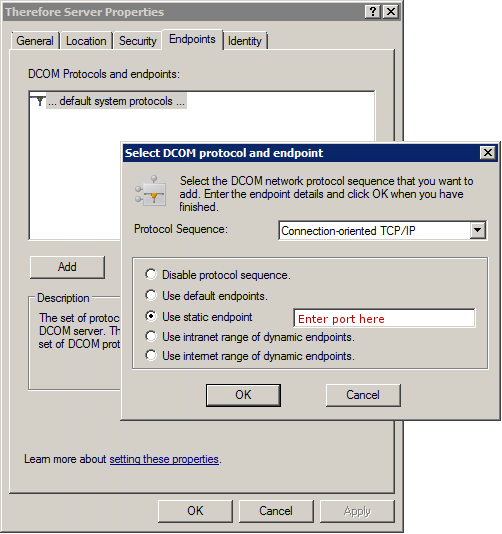
- Click OK
- Click OK
Important it is also necessary to open port 135 in the firewall
b) Windows Eventlog Error: “CoCreateInstance Failed. Access is denied”.
This indicates insufficient user rights on the Therefore™ server (DCOM level). Please make sure you have configured DCOM as per the installation manual.
If this doesn't help make sure that DCOM is enabled on the Therefore™ Server and Therefore™ Client. Open Component Services and drill down to My Computer. Right-click and choose Properties. Select the Default Properties tab and make sure that DCOM is enabled. Under the Default Protocols tab make sure that Connection-orientated TCP/IP is added.
Check that the Client is looking at the correct Therefore™ Server. Under Component Services expand the My Computer Object and click on DCOM Config In the right-pane scroll done until you see Therefore™ Server. Right-click on this and choose Properties. Choose the Location tab and make sure that the check box Run application on following computer is checked and that the correct IP address/computer name is entered.
In a WORKGROUP environment, users must exists on Therefore Server & on Client also with same name and password.
Applied to versions: All Versions
Was this article helpful?
That’s Great!
Thank you for your feedback
Sorry! We couldn't be helpful
Thank you for your feedback
Feedback sent
We appreciate your effort and will try to fix the article